Mouse Clicking is the basic way to communicate with any Online or Desktop Game and this post provides a software utility with which you can play your Game with assistance from a Mouse Clicking Software. Whenever playing a Game, you feel that a helping hand should be there to assist you in your Game to do repetitive Mouse Clicking, you can use the Auto Clicker to do repetitive Mouse Clicking as displayed in the screenshot below. As the Mouse Clicking is simulated by the software, whether you are using a normal Mouse or even a Gaming Mouse, this Software Application works just fine.
Auto Clicker
Yes the above presented software application is really easy to use and is really sophisticated application for advanced Mouse Clicking purposes. You can read all about it given below or navigate to the Auto Clicker page to download and try it yourself. This is a try before but Software Application and runs on Windows 10, Windows 8.1, Windows 8, Windows 7, Windows Vista and even on other Microsoft Windows Operating Systems running on 32 bit or 64 bit Architecture. It uses minimal RAM and CPU resources and various parts of the application are bundled as different applications so that when using one feature of the application, you do not need to waste RAM and CPU resources for features which you are not using.
Best Auto Clicker
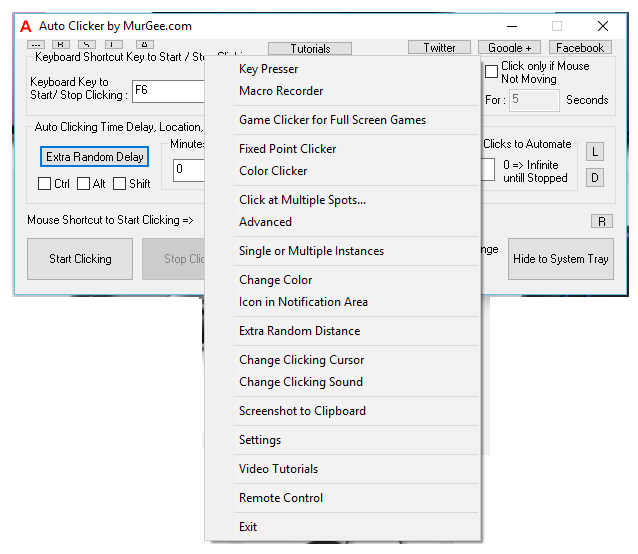
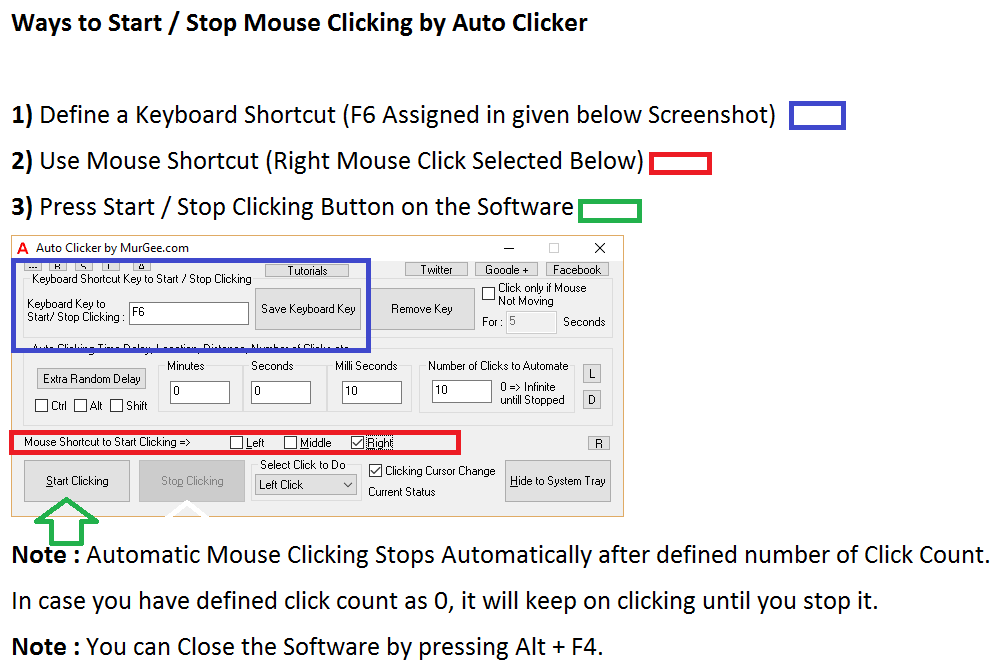
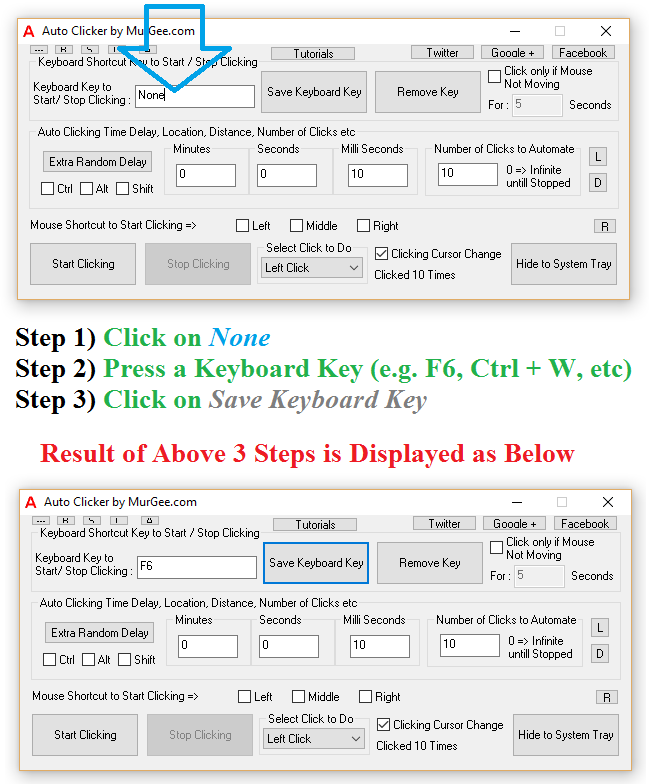
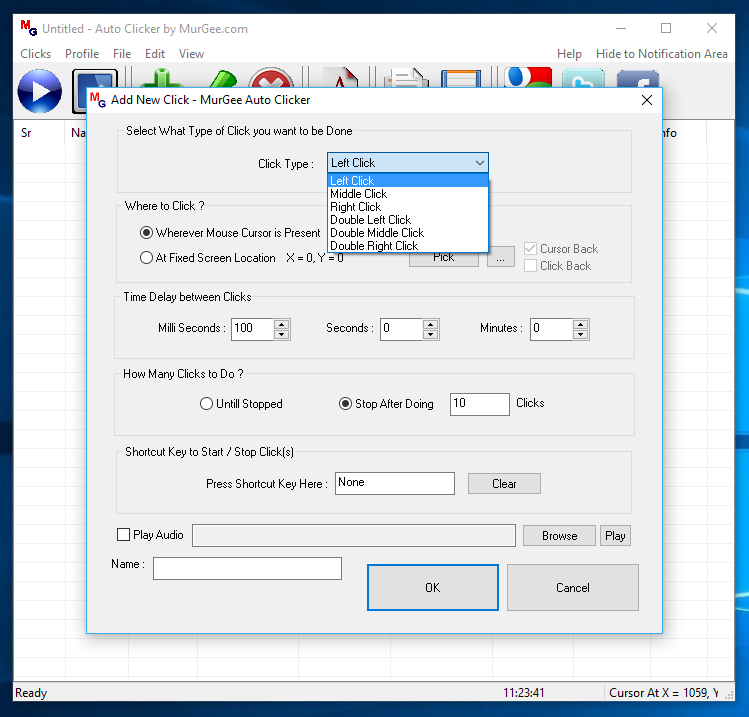
Vast variety of Automated Mouse Clicking features designed specifically for Games, definitely make this Mouse Clicking Application as Best Auto Clicker available. The simplest way to use this Mouse Clicking application is to define a Keyboard or Mouse Shortcut to start or stop automated Mouse Clicking. The Automated Mouse Clicking can be done in a fully controlled way at either of the given below locations:
- At Current Mouse Cursor Location or in other words, the software will click wherever you Move your Mouse Cursor.
- At Fixed Screen Location so that irrespective of your Mouse Cursor Location, the automated Mouse Clicking is done at a pre-determined Screen Location.
When playing a Game or even when using Windows Application and doing Mouse Clicking with physical Mouse buttons, there is a time delay associated. There is time delay between pressing of Mouse Button and then releasing it and there is altogether different Double Mouse Click delay. When we double click with our Mouse, we basically press and release the Mouse Button 4 times.
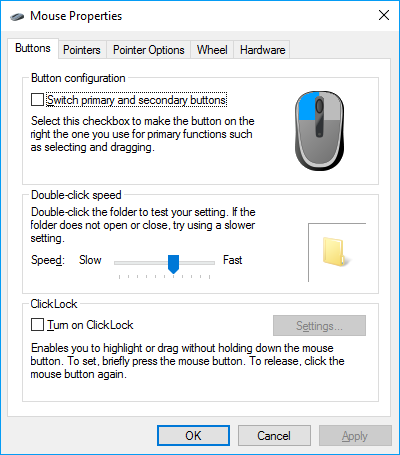
Mouse Properties to Control Double Click Speed
Microsoft Windows does allows us to control the Double-click Speed from Windows Control Panel. Switching primary and secondary buttons, changing Mouse Pointers, configuring Pointer Speed, enable or disable Mouse Pointer trails and much more is configurable from Mouse Properties applet of Windows Control Panel. Changing Mouse Cursor to a different Mouse Cursor or even an animated Mouse Cursor is one of the most common usages of Mouse Properties Screen.
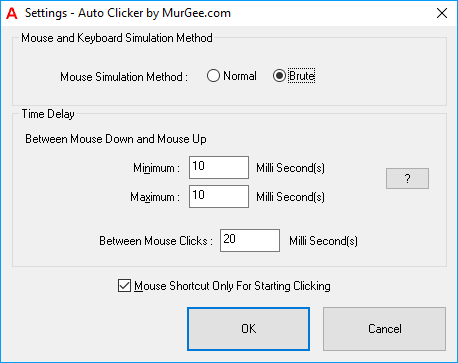
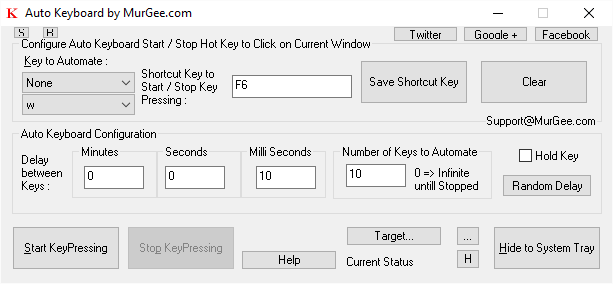
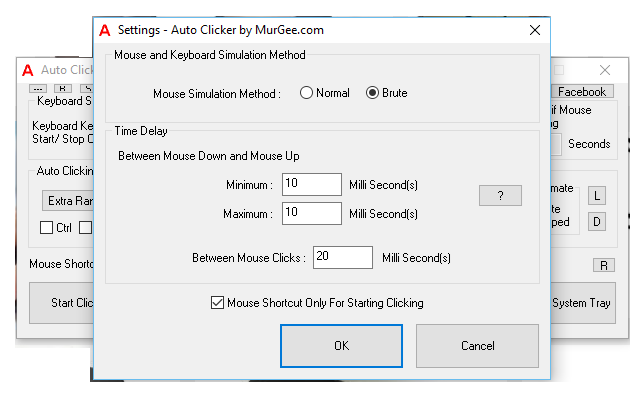
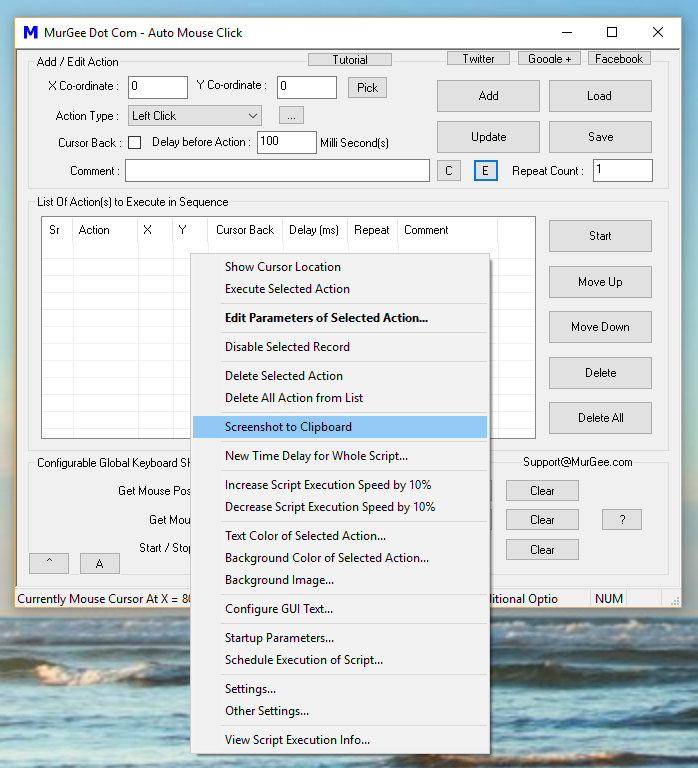
Auto Clicker Settings
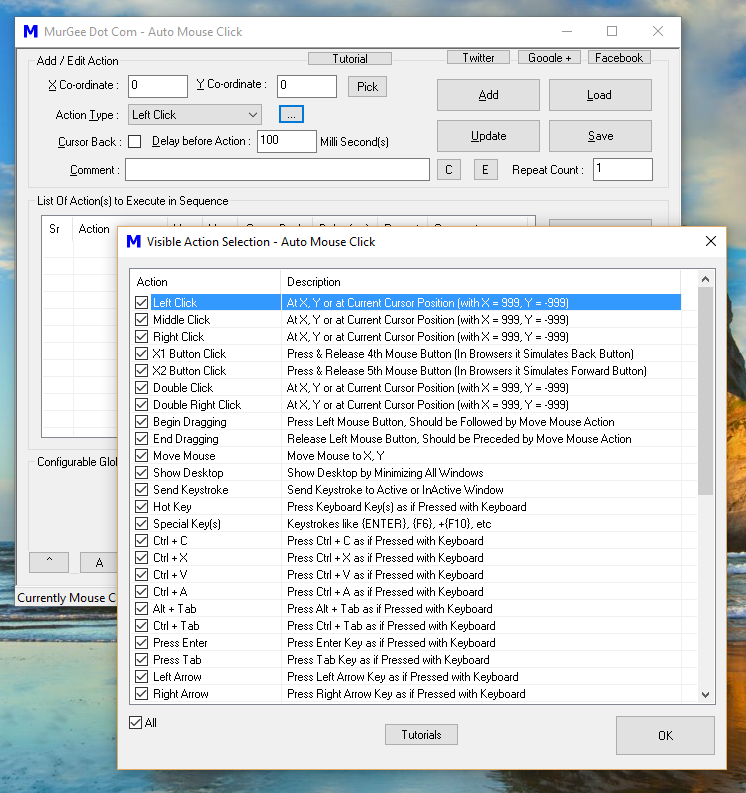
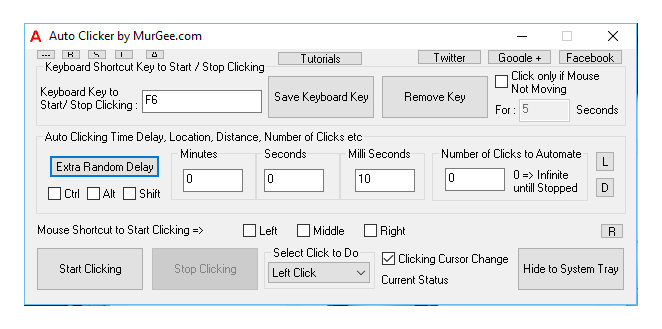
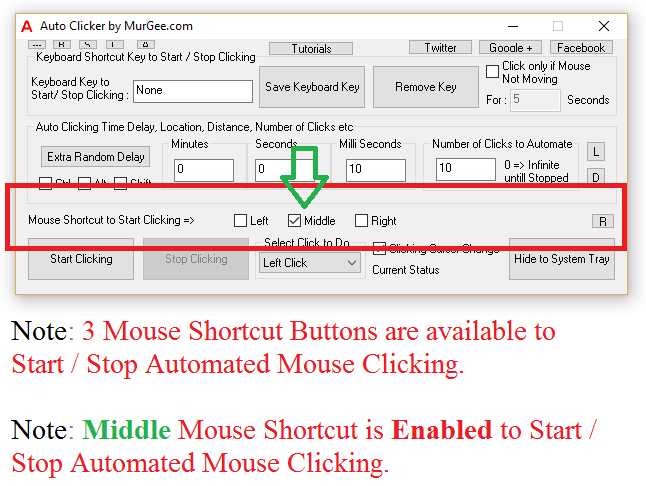
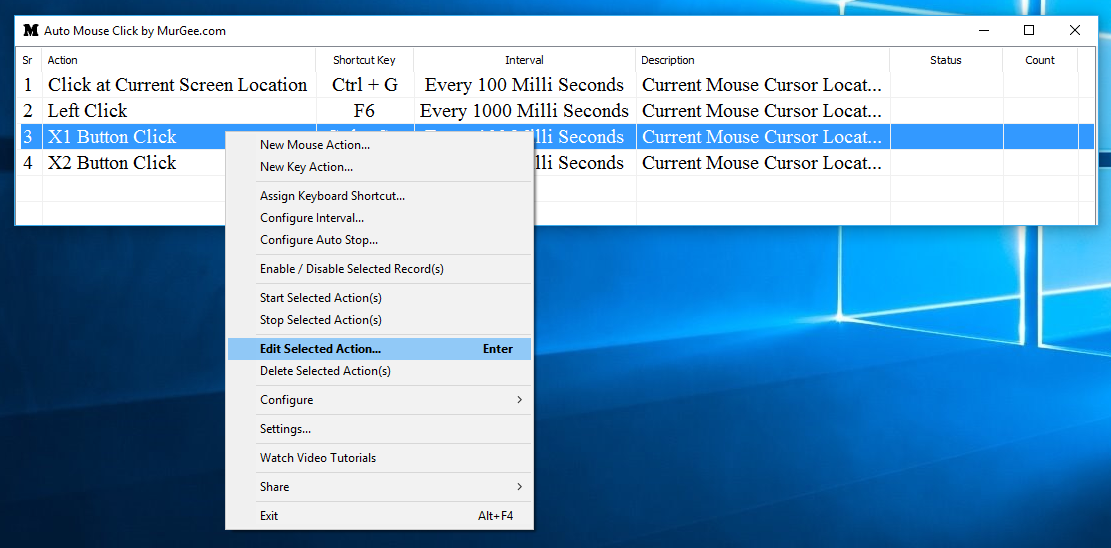
The Auto Clicker also provides configurable settings which allow you to control various aspects of Automated Mouse Clicking. In most cases default settings should be fine enough to go ahead, however if your Game is not recognizing the Automated Mouse Clicks, you might need to tweak the Time Delay between Mouse Down and Mouse Up or even the time delay between 2 Mouse Clicks making together a single Double Mouse Click. Note in the above Screenshot that there is a checkbox for configuring Mouse Shortcut and allows you to configure whether Mouse Shortcut should only start Automated Mouse Clicking or it can also be used to Stop Automated Mouse Clicking.
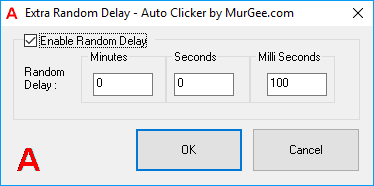
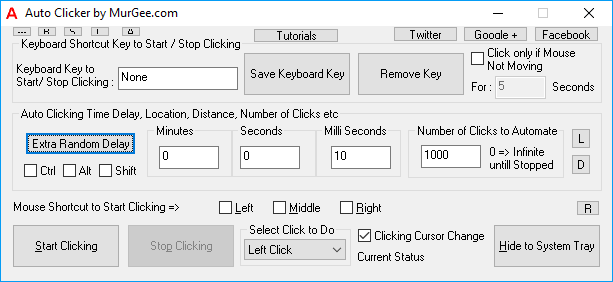
Random Time Delay in Auto Clicker
In order to emulate Human Mouse Clicking, you can use the Random Time Delay feature as displayed in the Screenshot above. By default the time delay between consecutive Clicks is configurable from the Main Screen and the Random Time Delay is disabled. Once you have enabled the Random Time Delay in the Auto Clicker, you need to define the random time duration which would be added to the actual time delay. Let’s say you configure Random Time Delay value as 100 Milli Seconds, then for every Automated Mouse Click done by the software, an extra Time Delay of value taken from 0 to 100 Milli Seconds would be added to the actual time delay as configured in the main screen of the software.
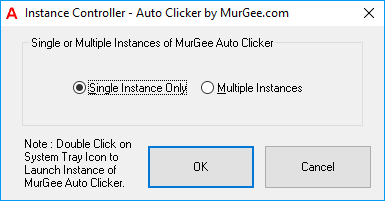
Instance Controller to Control Number of Auto Clickers
Games now a days are really complex and Automated Mouse Clicking needs can vary depending on the current Game Scenario / Phase. During Game Play, you might need to click at specific Screen Location at one time and then later in the Game, you might require to Click at Current Mouse Cursor Location. With Instance Controller you can enable Multiple Auto Clickers with different Setting for each Clicker. Once you have enabled Multiple Instances, you can double click on the Desktop Shortcut of the Software to launch another instance and configure it with different Keyboard Shortcut to Click at another Screen Location with different Time delay.
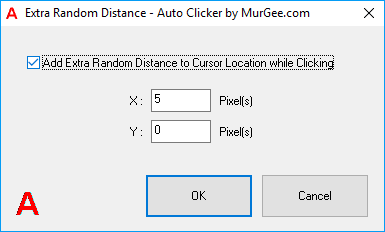
Random Distance for Automated Mouse Clicking
Whenever doing Fast Mouse Clicking with fingers, your Mouse Cursor can move a little, whereas when you do Fast Mouse Clicking with the Software Application presented here, the Location of Clicking was either current Mouse Cursor Location or Fixed Screen Location. Now with the Extra Random Distance feature, you can simulate automated Mouse Clicking with Random Distance in either horizontal or vertical direction or even in both directions.
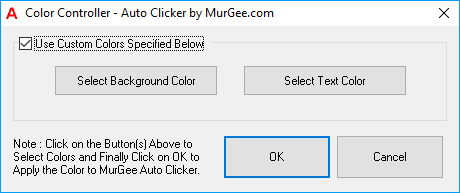
Change Color of Auto Clicker
Most of the Applications running on Windows do adapt themselves to current Windows Theme automatically, however when you want to distinguish multiple Auto Clickers you can change Color of the Software to easily identify them. Do have a look at the above Screenshot which displays how you can change the appearance of this Mouse Clicking Application by changing the Background and Text Color. Yes Title bar, Font Style, Appearance of the Software will remain as configured for other Applications using Windows Themes, however a distinct Foreground and Background Color of the Graphical User Interface will definitely help you to distinguish between multiple instances of the Auto Clicker running with individual icons in Notification Area.
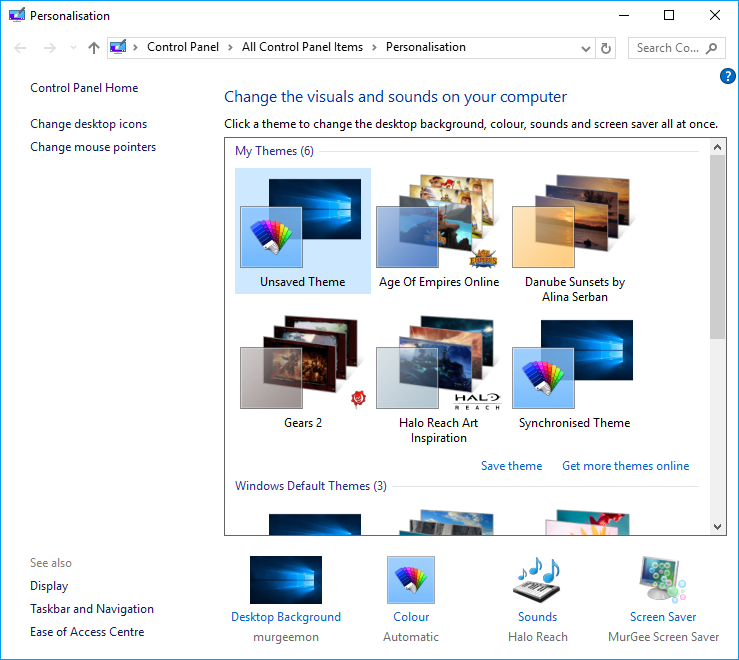
Windows Theme Settings
As displayed in the Screenshot above, you can change Current Theme of Windows by selecting any existing Windows Theme from Personalisation settings of Control Panel. Note that Age Of Empires Online, Gears 2, Halo-Reach Art Inspiration and other themes are available for selection. Yes you can even customize Font, Font Style, Font Size and other parameters of Windows Applications from Advanced Display Settings.
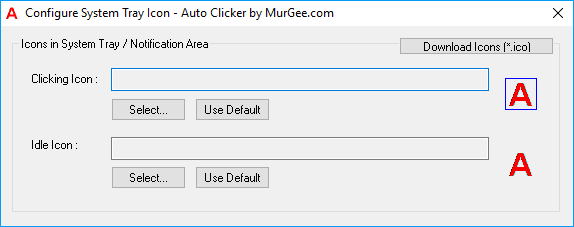
Configure Notification Tray Icon of Auto Clicker
Apart from configuring the appearance of the Software, you can even configure the Notification Tray Icon to easily identify and control the Auto Clicker. First Icon is the standard Icon which is displayed when the Mouse Clicking Software is not doing any Automated Mouse Clicking and other configurable Icon is displayed when Mouse Automation is used to send Automated Mouse Clicks to Active Application. Each Icon is basically a .ico file and there are lots of online websites which allow you to download the icon files for free. For easy identification, you can download Icon of the Game you are playing and assign it with the Configure System Tray Icon Screen so that you can remember the Automated Mouse Clicking Settings easily.
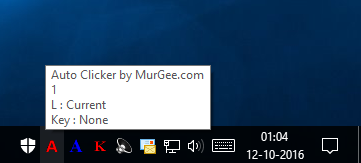
Notification Popup from Notification Icon
You can simply Move Mouse Cursor to appropriate Icon in Notification Area to view settings of that particular instance as displayed in the screenshot above. Note that Instance Number, Location of Automated Mouse Clicking and Configured Keyboard Shortcut is displayed in the popup. You can simply Drag any Notification Icon in the Taskbar and move it to a different location. Yes various properties of Taskbar are also configurable from the Taskbar Settings as displayed in the screenshot below.
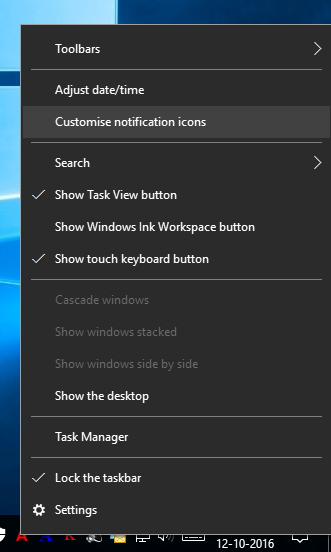
Customise notification icons
In order to get started Customizing notification icons, right click on the Date / Time in the Taskbar and click on Customise notification icons as displayed in the screenshot above. Once you done that a new screen will appear which will allows you to configure and control the notification icons. Note that you can Lock or Unlock the Taskbar, Combine Taskbar buttons and fully control what notification icons you want to see.
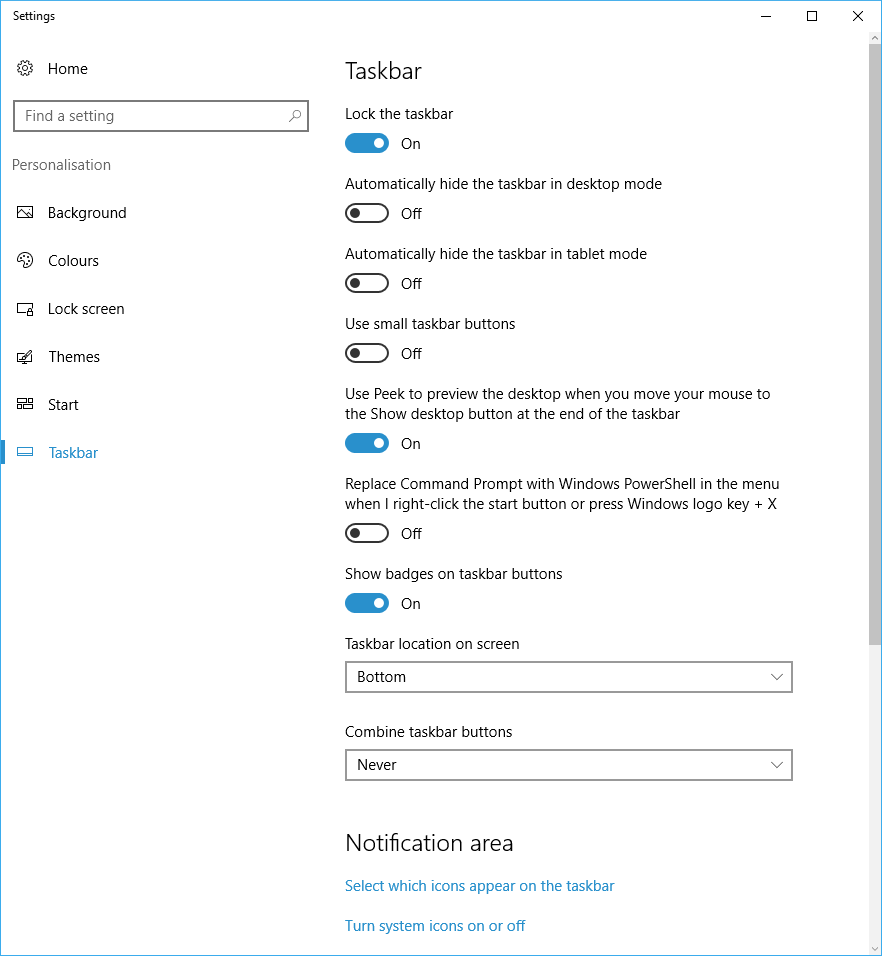
Taskbar Settings
Once you can see the Notification icon of this Mouse Clicking Application, you can right click on it to configure and control the associated Auto Clicker as displayed in the screenshot below. You can alternatively double click on the Notification Icon to bring the associated Auto Clicker to front. When you are done configuring the settings of the Software, you can click on the Hide to System Tray button to hide the Main Application Window, hide Taskbar Icon and display a Notification Icon depending on the Taskbar settings.
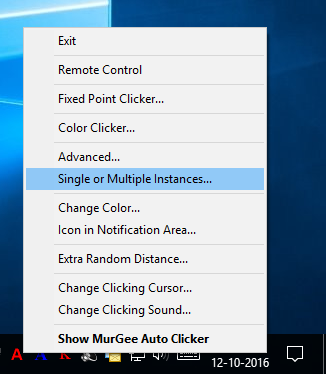
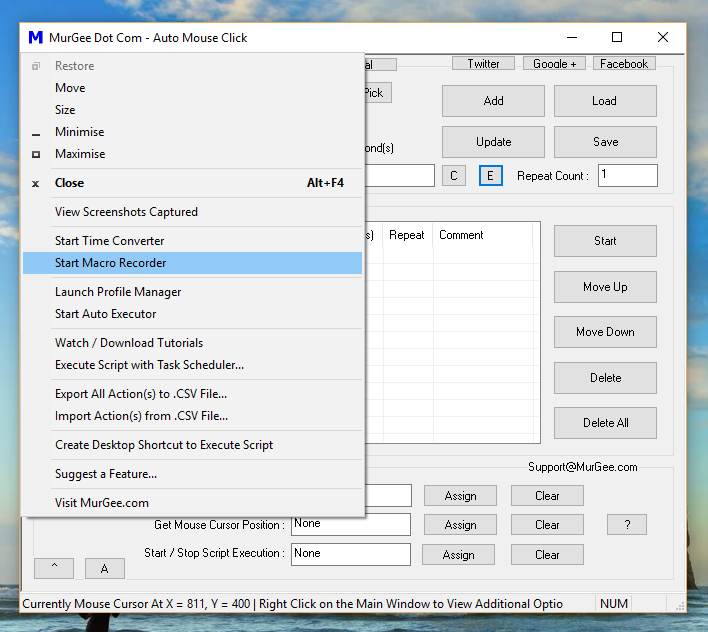
Menu from Notification Icon of Auto Clicker
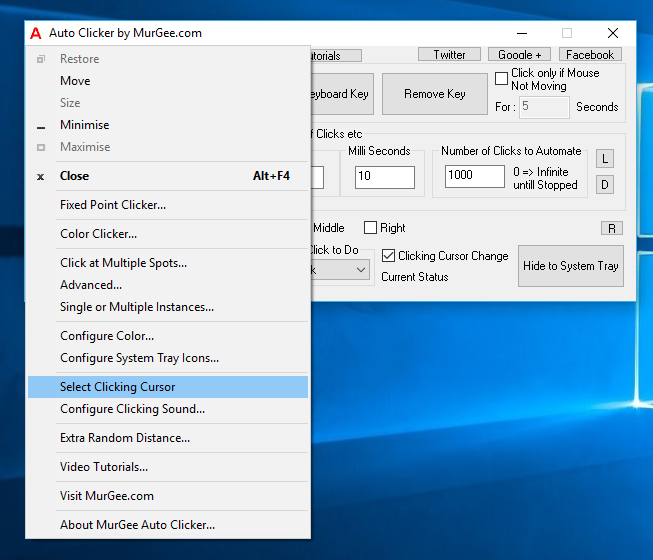
Another way to distinguish whether Automated Mouse Clicking is being performed or not is by looking at the Cursor. By default when Mouse Clicking is being done, the Mouse Cursor changes to Red Color Cursor. The Application Icon also changes to a different icon which is configurable as outlined earlier in this post. In order to change the Clicking Cursor, Click on the Top Left Corner of the Software and Click on Change Clicking Cursor as displayed in the Screenshot below. Once you Click on the Menu item as displayed in the screenshot below, you can select any .cur file which is a Cursor File and use it to visually identify whether Automated Mouse Clicking is in effect or not.
Change Auto Clicking Cursor
You can even have audible indication of Automated Mouse Clicking by enabling Mouse Clicking Sound. In order to enable Mouse Clicking Sound, you need to select a .wav file which would be played for every Automated Mouse Click performed by the software. Make sure to select a short duration .wav file so that, you can hear the Mouse Clicking Sound clearly. Windows does provides lots of .wav files in C:\Windows\Media folder as displayed in the screenshot below.
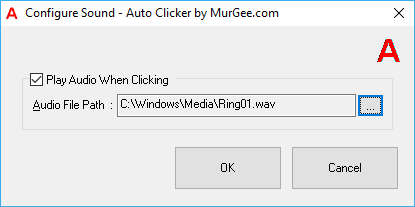
Mouse Clicking Sound
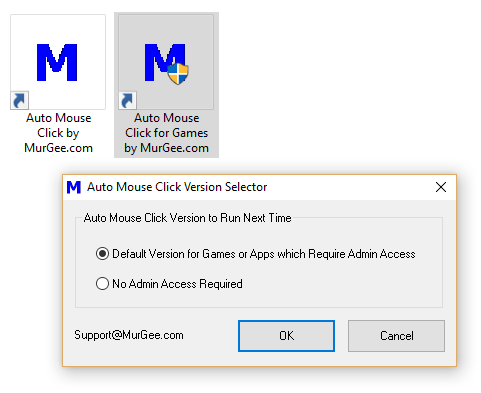
Auto Clicking on Online Games can be different as compared to Clicking on Desktop Games and hence the Software Installer installs two desktop shortcuts, one for Online Games and another for Desktop Games. The only functional difference between them is the Access with which the Desktop Shortcuts launch this Mouse Automation Software. The Auto Clicker for Games Shortcut launches the Application with Administrative Rights and other Shortcut launches the Application under signed on user credentials.
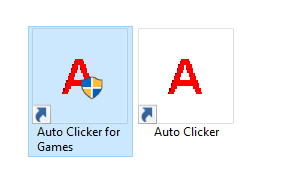
Auto Clicker for Desktop and Online Games
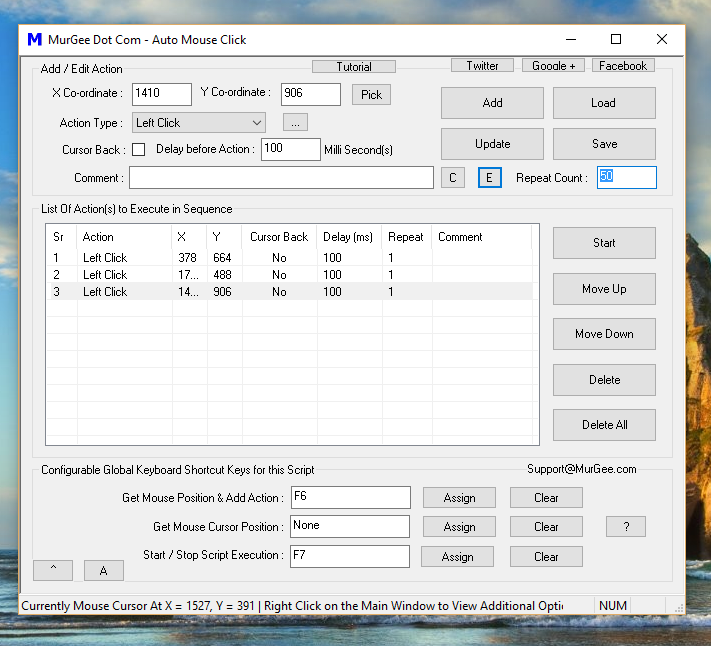
When you want to Auto Click at one or multiple Fixed Screen Locations in a Game, you can use the inbuilt Fixed Screen Location Clicker as displayed in the Screenshot below. It allows you to define at maximum 6 screen locations at which you can click with 6 different keyboard shortcuts. Pressing the corresponding Keyboard Shortcut would click 1 time at pre-determined Screen Location. Note that the number of Left Clicks automated with this Mouse Clicker is also displayed with every Mouse Click Configuration.
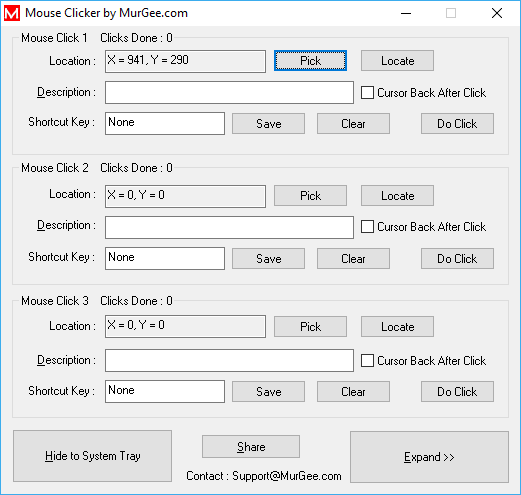
Auto Click at Fixed Screen Location
Another useful way of Automated Mouse Clicking is by matching Screen Color. Now you can let the Software do the Pixel Color Matching and Clicking with Color Clicker as displayed in the Screenshot below. This can be really useful in a Game in which the object to be clicked moves rapidly. All you need to do is define a Keyboard Shortcut and place Mouse near to the sprite or any other Moving Object in a Game. Upon pressing the Keyboard Shortcut, the Color Clicker will automatically match the Color stored in the Software and will Automatically Click it. Note that the area around Mouse Cursor is configurable and effectively, the smaller the search area, the faster Color Matching can be performed.
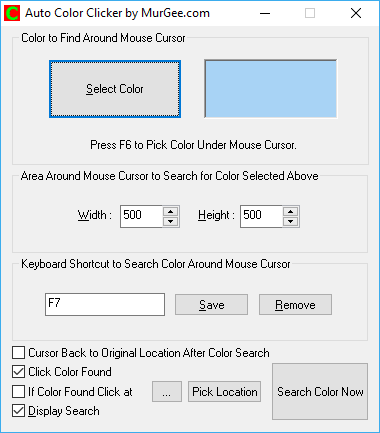
Auto Click with Color Identification
When you have a Complex Game in which you need to Click at Multiple Screen Locations, you can either use Multiple Instances of Auto Clicker as mentioned earlier or use the new Tool available as displayed in the Screenshot below. The given below Screenshot displays 4 different Mouse Clickers added in a single window with different Keyboard Shortcuts. Yes you can even assign one single Keyboard Shortcut to start all 4 Mouse Clicker simultaneously. Configurable Speed of Clicking, availability of Key Presser and easy configuration allows you to focus on your Game and let this unique Advanced Mouse Clicking Software do the clicking for you.
Auto Click at Multiple Screen Locations Simultaneously
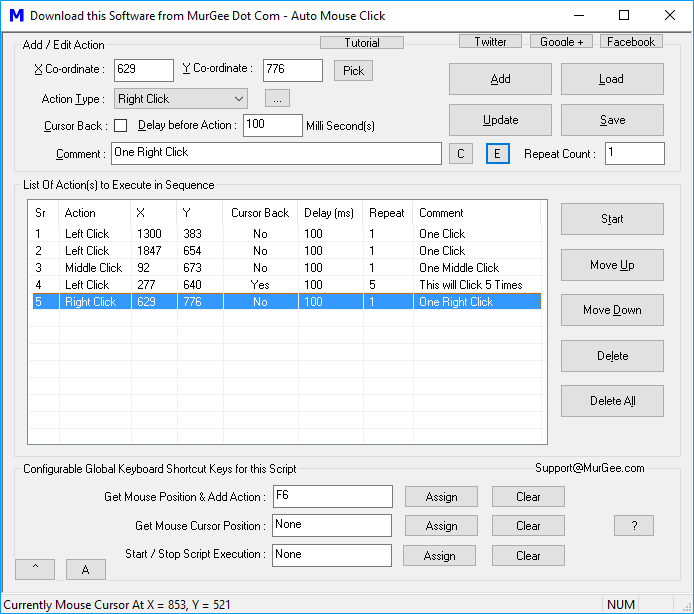
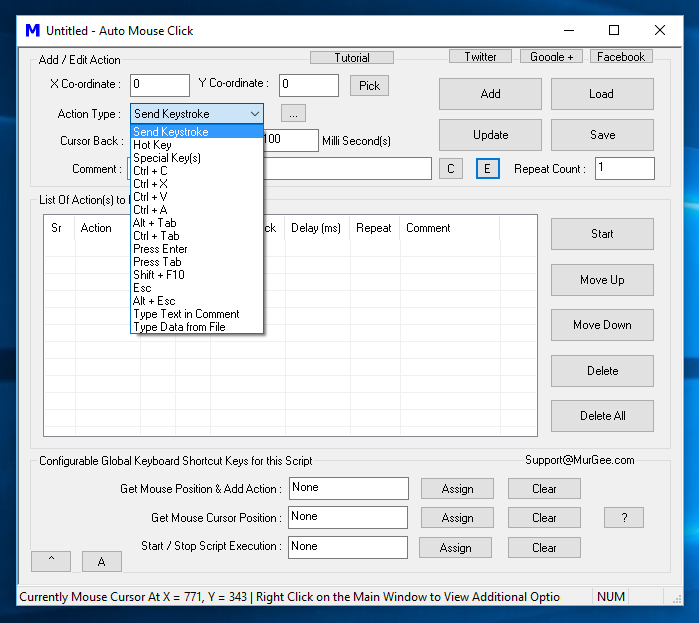
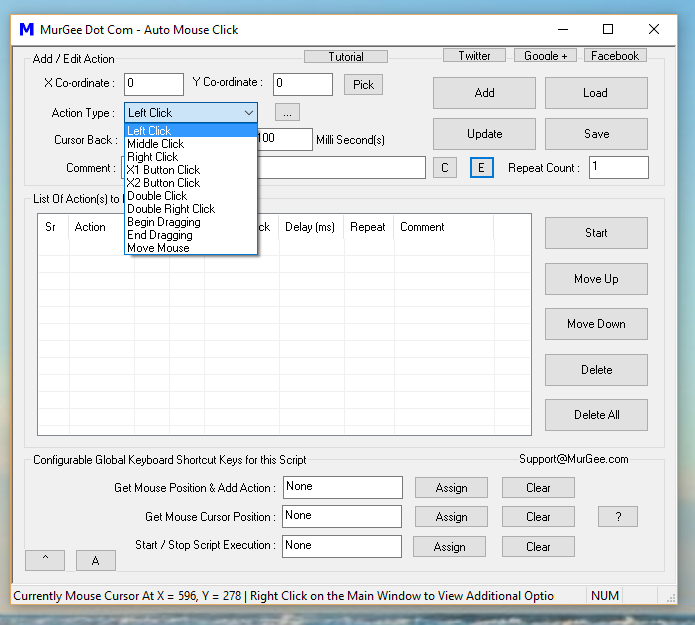
When you need more control of Multiple Auto Clickers, you can use the inbuilt Advanced Auto Clicker to add as many Mouse Clickers in a single Application. Each Gaming Profile containing single or multiple Mouse Clickers can be stored in a different File so that depending on the Game you are playing, you can load the appropriate Gaming Profile in this Advanced Auto Clicker. As displayed in the Screenshot below, you can Automate Left Click, Middle Click, Right Click, Double Left Click and other Mouse Click Types in the Software. All the Mouse Clickers added to the software, run with their own Timers so you can start / stop any of the Mouse Clicker with associated Keyboard Shortcut.
Advanced Auto Clicking with Multiple Timers
Online Games run in browsers and hence running this Mouse Clicking Application under signed on user credentials is sufficient. However Games which are installed on your Windows Computer generally require Admin Access to be launched and hence you need to use different way to control and Automate Desktop Games with Automated Mouse Clicking.
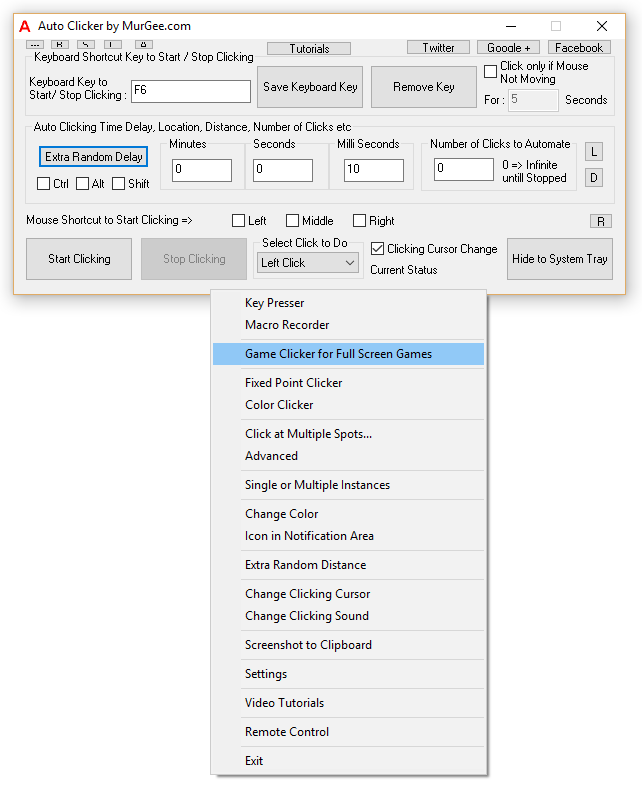
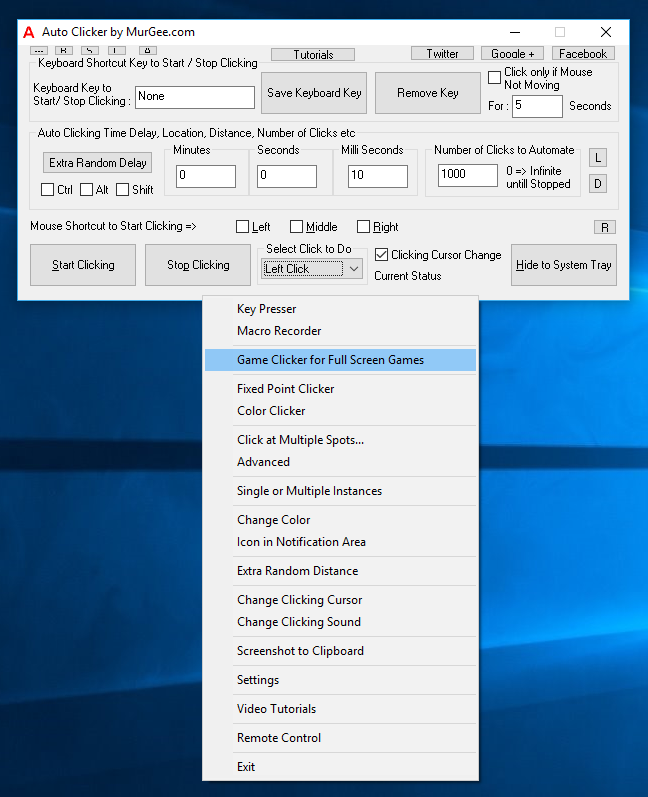
Game Clicker for Full Screen Games
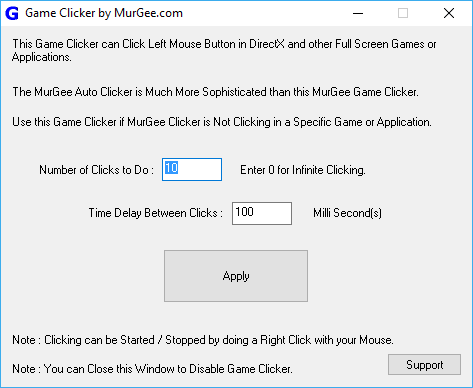
Various Full Screen Games use Direct X or Open GL to provide rich Graphical User Interface, however thy use different mechanism to read and interpret user input in the form of Mouse Clicking and key Pressing. When playing a Full Screen Game in which the Auto Clicker fails to Click, you can use the Game Clicker to Simulate Mouse Clicking. This Game Clicker has a single Mouse Shortcut to Start / Stop Automated Left Mouse Clicking as displayed in the Screenshot above. Note that Number of Automated Mouse Clicks to perform and time duration between Automated Mouse Clicking is configurable. Whenever you wish to disable the Right Mouse Click Shortcut to Start Left Mouse Clicking, you can simply close the Game Clicker and no more automated Left Mouse Clicks will be performed by the Game Clicker.
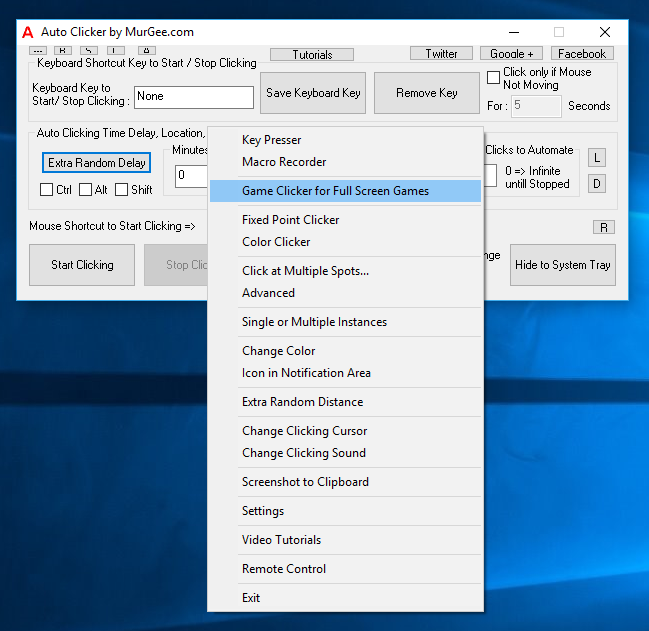
Launch Game Clicker from Auto Clicker
You can Launch Game Clicker from Right Click menu of the Auto Clicker as displayed in the Screenshot above. Using Game Clicker for the first time requires extra installation and is fully guided along with Video Tutorials. Once you have followed the steps to Download & Install the files required for Game Clicker, you do not need to perform the steps again and again. When you launch Game Clicker for the first time, the Game Clicker Installer will appear and guide you to the complete procedure as displayed in the screenshot below. One thing here to note is that on Windows 10, the Game Clicker Installer displays the Operating System name as Windows 8.1 and otherwise there are no installation issue in installing Game Clicker on Windows 10.
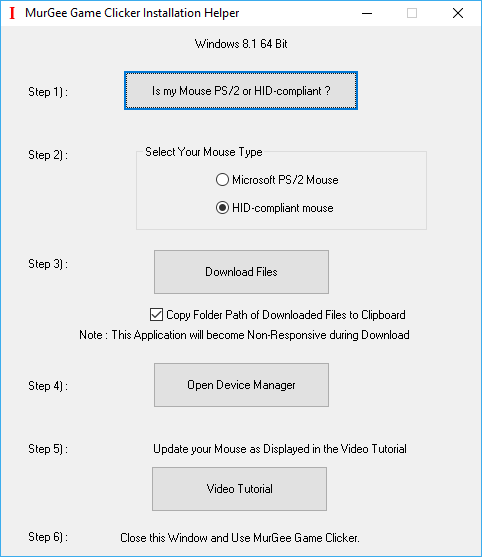
Game Clicker Installer
Upon successful installation of the Game Clicker, you can verify the installation by looking at the Device Manager of Windows Control Panel as displayed in the Screenshot below. The Mouse Clicks sent by Game Clicker are sent on lower level as compared to the Main Application and hence you would need to have Administrative Access to your Windows Computer in order to install and use the Game Clicker.
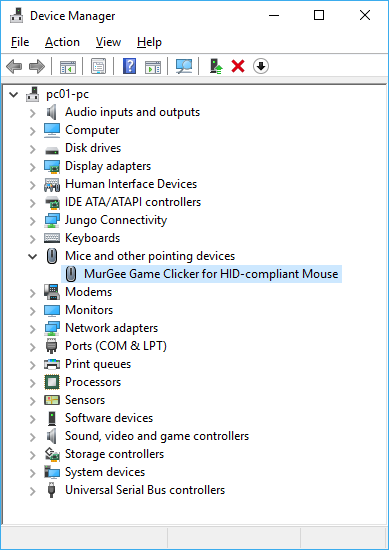
Verification of Game Clicker Installation on Windows 10
Once you have successfully installed the required files for Game Clicker, you can use the Game Clicker to Auto Click in any Desktop Application, Browser Game, Desktop Game or even on Full Screen Game running on Direct X, Open GL or any other technology. When Auto Clicker is not Clicking, this Game Clicker can become really handy to ensure that you can still Auto Click with Game Clicker. Yes there are enough Video Tutorials available for learning how to use each and every feature of this unique and best Mouse Clicking Application. Within minutes, you can learn how to Click Faster than every before, without straining your fingers.
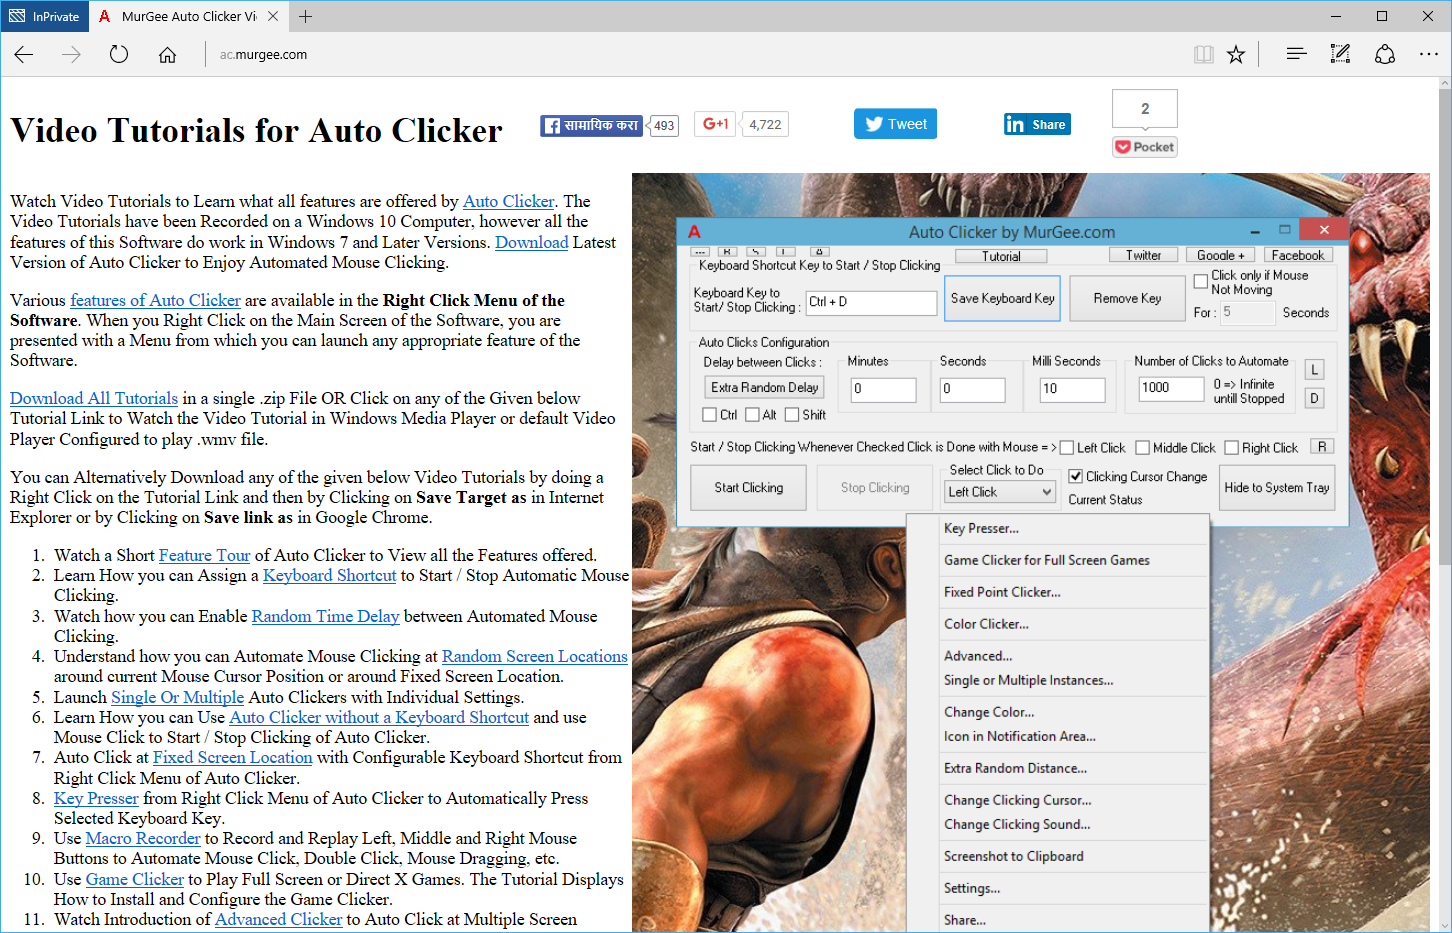
Video Tutorials of Auto Clicker
Yes Auto Clicker does have lots of configurations and features in which you can control Mouse Automation and must be used whenever possible. Configurable Location & Speed of Clicking, option of adding Random Time / Distance to Automated Mouse Clicking, Mouse & Keyboard Shortcuts to Start / Stop Automated Mouse Clicking, Audible / Visual alerts for Mouse Clicking and much more makes it the really Best Auto Clicker for Gamers to automate Repetitive Mouse Clicking in Games and other Applications. Download the Free trial of the Software, Install it and use it for Free and play only when you are completely satisfied by the features offered by this Mouse Automation Software.